Monday, May 6, 2024

Home Canning and Preserving


Photo source National Center for Home Food Preservation

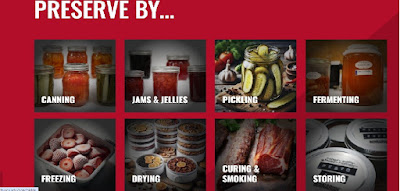
The USDA Home Canning and Preserving is now found at the National Center for Home Food Preservation University of Georgia. This is a great way to find all the latest information on home food preservation safely.  

"As gardening season begins, people may already be wondering how to manage their garden's bounty. Don’t know what to do with all your tomatoes, cucumbers, peppers, apples, pears, plums and grapes from your garden and fruit trees? Have you considered preserving them?

Everything you need to know about canning and food preservation is available in USDA’s Complete Guide to Home Canning. This resource is for people canning for the first time or for experienced canners wanting to improve their canning practices. The information is based on research conducted by the National Center for Home Food Preservation in cooperation with USDA’s National Institute of Food and Agriculture (NIFA).

The guide contains many research-based recommendations for canning safer and better-quality food at home. Users can explore scientific principles on which canning techniques are based, discusses canning equipment, and describes the proper use of jars and lids. The guide contains basic canning ingredients and procedures and how to use them to achieve safe, high-quality canned products. Users can also search for specific foods, procedures, and recipes. 

The free web resource is on the National Center for Home Food Preservation website 

Through federal funding and leadership for research, education and extension programs, NIFA focuses on investing in science and solving critical issues impacting people's daily lives and the nation's future. Canning excess food, whether from the grocery store or the garden, is an excellent way to reduce food waste and improve nutrition security by ensuring you always have healthy, tasty food whenever you need it."  
~Source USDA Website

It's a free resource to help you put the harvest back safely.  I hope you take a minute to 'tour' the new website. 

~a little bird

Saturday, June 24, 2023

Homemade Bread and Charcutier Board

 Do you make homemade bread??  I do, and I have discovered a great way to slice it.  I use my meat slicer.  When I slice bread by hand some are skinny some are too thick, etc.  But with a meat slicer I set the width and they are all the same.  It works GREAT!!  I also use the meat slicer for block cheese, summer sausage and other cured meats.  Making my own charcuterie boards quick, easy, and less expensive.  


Thursday, January 12, 2023

Homemade Noodles


Do you make homemade noodles? My Grandmothers did.  I remember, Grandma rolling these out paper thin and letting them dry on the counter then she would roll them cinnamon roll style and slice them with a knife.  Then she would lay them all out flat again to dry. Oh my, they were wonderful!! 

I too make homemade noodles, but to be honest, I have never gotten them rolled as thin as grandma's.  So, I have a wonderful cheat.  I use a pasta roller. 

My DH bought me the attachments for my Kitchen Aid Mixer - Which are wonderful!


And then one day out at the thrift store I found the below unit for $2.99!  Even though I had the above I couldn't pass up the hand crank pasta roller for under $3.00!  I can always use it in the camper, right!?  Ha ha ha!!


When we have pasta night both pasta rollers are in service.  We set up two different pasta stations and the kitchen is a hive of activity.  

Large pots of boiling salted water bubbling away, different types of sauces simmering, yum!!  That's pasta night.  

Grandma would make Beef and Noodles or Chicken and Noodles.  I don't think she ever made Spaghetti or fettuccini to my knowledge.  But I know she would enjoy pasta night too. 

Homemade Egg Noodles
2 cups flour (I use 1 1/2 cup AP flour and 1/2 cup whole wheat flour)
Salt 1/2 teaspoon or to taste.
2 or 3 eggs 
If the dough is to dry add a bit of water 
If the dough is to sticky add a bit of flour

I use semolina flour for dusting the dough and noodles, so they don't stick together.  You could use semolina flour instead of the whole wheat up to one cup.

Knead in your mixer or by hand to bring together into a smooth ball.  Wrap in plastic and allow to rest at least 20 minutes. 

Then roll the dough out thin or use a cheat like me and pull out your favorite pasta roller.  

Bon Appetite, 
a little bird

Sunday, August 28, 2022

A Bit Cooler Today

 It is just a bit cooler today.  In the mid 80's and it feels so nice!  We have had so much heat for so long!!!  What a reprieve to have a day below 99 to 104.  It's supposed to warm again next week but maybe, just maybe, this means the weather will start the turn to the cooler side.

I love autumn.  It is my favorite season!!  I love the smells, the colors, the garden harvest.  I love the warm days and the crisp cool nights.  I guess my longing is showing. 😄

Our little garden is producing.  The fruits of our labor so to speak.  


The cucumbers are in a crock starting the fermentation process. Fermented Dill Pickles
My cucumbers are not the little ones, so I sliced them like a hamburger dill.
The tomatoes have been canned.  Canning Tomatoes
The carrots were grated and made into a carrot and raisin salad.

Our little garden is a sweet blessing, and we enjoy all its produce.
Think fall and enjoy something fresh from a garden near you!
~a little bird


Monday, August 15, 2022

Refreshing Summer Drink


Do you remember the preserved limes?  
I have cut one of them in eights, muddled a bit, added some lemon balm from the herb garden and a few violets.  Some ice and filtered water and you have a very refreshing herbal summer drink.

We have had some very hot weather and trying to stay hydrated is important.
I find if I put together a pitcher of herbal iced tea, or like this a lime-lemon balm infused water we tend to drink more throughout the day.


How are you staying hydrated??
a little bird


Monday, August 1, 2022

Dehydrating

 The dehydrator is preserving some of our harvest.  The wax beans are producing more than we can eat in a setting or even two. So, it was time to put the dehydrator to work.

Link to Drying Fruits and Vegetables


Steam blanch or water blanch, cool and into the dehydrator they go.

The cabbage is also doing very well.  And before they split, they need to be eaten, shared and put by.  I still have some sauerkraut from last year so don't need to make more at this time.  We have eaten sauteed cabbage at many meals and will continue to do so.  Have shared many heads with family and neighbors, and there is still more coming... So, it is time to dehydrate some for soups this winter.


As with the beans, steam or water blanch, cool, and into the dehydrator.

I had one tray still empty, so I roughly chopped some parsley to complete the load.


These will all be used and enjoyed this winter when the winter winds blow, and the garden is covered with a blanket of snow.
I hope you too are harvesting the bounty of the season.
~ a little bird


Lavender


My lavender has dried so I have harvested the flower buds.
It smells wonderful!! 

I have a pint of lavender buds.  My DH asked what I can do with them??

Here are some great ways to use lavender:

  • make potpourri
  • homemade soap
  • add it inside of oil lamps
  • Lavender tea
  • add to green tea
  • add to salad dressing
  • make sachets 
  • add to shortbread cookies 
Lavender Tea - a few lavender buds and some hot water and you have a lovely cup of calming tea.

Lavender infused oil - add some lavender buds to almond oil and gently warm over a simmering double boiler.  Use the oil in your homemade creams and salves.

Lavender lemonade: 
2 teaspoons lavender buds
4 cups water
Juice from 2 large lemons (or 1/4 cups store bottled)
sweeten to taste 1/3 cup sugar or 1/4 cup honey 

Place lavender buds in reusable tea bag   Pour 4 cups of boiling water over the buds and allow to steep 15 minutes. Remove tea bag and add your sweetener, stir to dissolve, allow to cool completely.
Add lemon juice and serve over ice.  Lovely!!


I tied and allowed my lavender to dry in an airy place.
Then when they were completely dried, I was able to rub them between my palms and the flower heads came right off.
I should have taken a picture....
So here are a few ideas if you have some lavender buds to harvest.
~ a little bird


Thursday, July 7, 2022

Quick Trip

 We made a quick trip.  We went to a memorial service for my dear husband's aunt.  Were able to see and spend time with his sweet mom, my lovely mother-in-law.  It was a quick trip, and we weren't able to see all of the family. But we saw some. 

In truth we spent most of the time driving there and back.  We wanted to see some new areas. 

Custer State Park in South Dakota, this is a beautiful park right by Mount Rushmore and Crazy Horse Monument. 

Driving through the Badlands is a worthwhile drive, so different and interesting.

We stopped at Lake Michigan both going and coming.  I love the Great Lakes!!!


Lake Michigan at sunset


We stopped for lunch at Lake Superior on the way home.


Abraham Lincoln State Park in North Dakota.  I wanted to see the house Libby and George Custer built and lived in, at that time, in the wilderness of North Dakota.


Harp


and Yellowstone National Park - Gibbon's Falls


Norris Basin


When were there only part of the park was open due to the flooding.

We spent 5.5 days driving to, 6 days there, and 7 days driving home. I wish we could have caught up with all our family... but it just didn't work out this visit.  Our main focus was the memorial service and DH's mom.

Our sweet grands (and their parents) took care of the mowing and watering.  

The garden grew by leaps and bounds and so did the weeds 😀 but we are getting them pulled and the garden looking as it should again.

The herbs were ready for harvest when we got home.  Here are a few that have been cut.


The Lavendar is cut and hanging to dry.


Basil and Parsley in water to keep it fresh for usage right now.  The rest went into the dehydrator for this winter.


There were cherries to pick too!


So Danish Cherry Sauce was put by, Cherry Jam, and Brandied Cherries.
As well as many eaten fresh.  They are all put up or eaten now.  I do love cherry season!!

The garden is producing much lettuce, kale, and peas.  We are eating a salad once if not twice a day trying to keep up with the production.
Lettuce doesn't preserve so we have to just eat it while it's in season and enjoy it!!

That is what we've been up to lately.
Hope you are well and enjoying the bounty of the season.

The LORD bless you and keep you;
the LORD make his face shine on you and be gracious to you;
the LORD turn his face toward you and give you peace.
Numbers 6:24-26

blessings,
a little bird


Thursday, May 26, 2022

Tepache Update


The latest batch of Tepache I have made without yeast added in.  I prefer this batch.
There is enough natural yeast on the exterior of the pineapple rind.  I did wash the pineapple, but I didn't SCRUB it.  Just a good bath with clean fresh water.
The rind went into my jar with water and sugar.  That's it.  And you can see the bubbles it's producing.  It's a very lovely and refreshing pineapple soda.

~ a little bird

Monday, May 9, 2022

Gluten Free - Rice Blender Bread


Rice Blender Bread
recipe from HERE

2 cups raw white rice 

1 cup water

3 Tbsp vegetable oil

1 tsp salt

2 Tbsp sugar

1 Tbsp yeast

Place your 2 cups rice in a bowl, cover with plenty of water, and allow to soak for two hours.

Drain rice well and add to a high-powered blender along with water, oil, salt, and sugar. Blend until very fine. (Pinch a bit of the batter between thumb and fore finger to feel to see if it is still gritty. If it is blend it a bit more.) Your batter should be warm but not hot now is the time to add your yeast give it a few more pulses to blend the yeast in.

Pour the batter into a greased bread pan.  I used parchment paper in the bottom of the pan.  The batter should only fill your pan halfway.  Allow to rise (15 to 25 minutes) Bake at 375 F degrees for 35 to 40 minutes, or until golden brown.  Internal temp should be about 210 degrees. 

When done turn out to cool.

This bread is tasty, light crumb, has spring, and looks pretty.  I was very pleased with the result and happy to have another gluten free option.

~a little bird


linkwithin

Related Posts Plugin for WordPress, Blogger...